# 555 Servo Controller
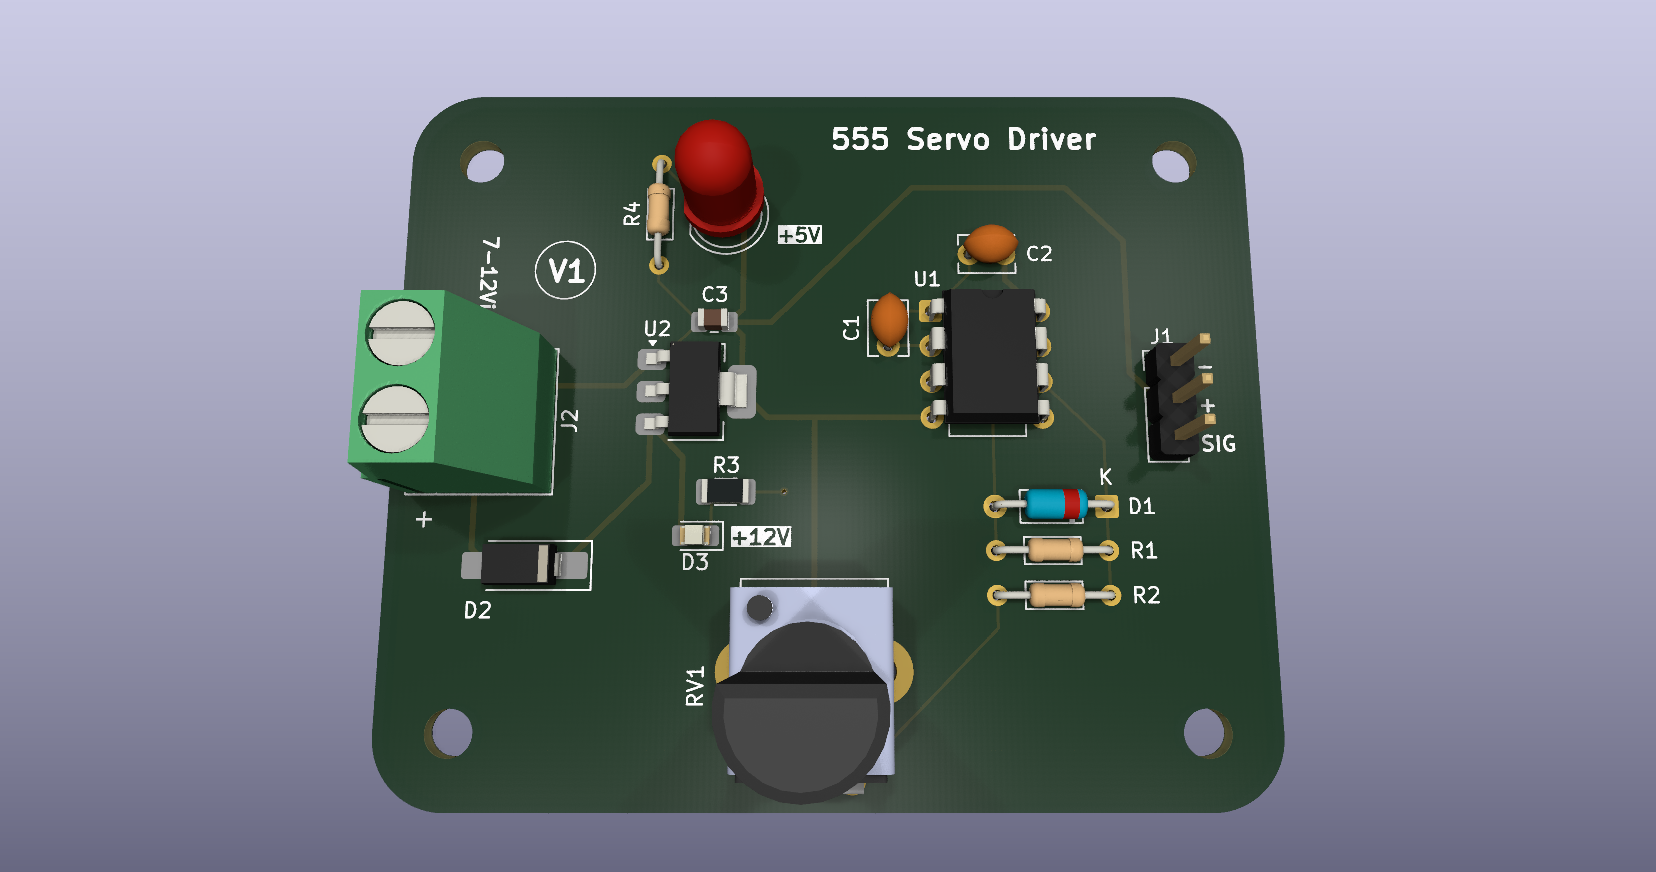
A 555 timer based servo controller designed in KiCad as part of my PCB design learning journey. The project focuses primarily on the PCB design workflow, including schematic and footprint selection, component placement, routing, 3D visualization, design-rule verification, and preparation of fabrication files.
> **Project status:** PCB design completed. The board has not been physically manufactured or tested.
> **[View Project Website →](https://shlok-ac.github.io/Servo-Controller-555/)**
[](LICENSE)
[](https://kicad.org)
[](https://github.com/shlok-ac/Servo-Controller-555) [](https://github.com/shlok-ac/Servo-Controller-555) [](https://github.com/shlok-ac/Servo-Controller-555/issues)
## TL;DR
- Designed in **KiCad 10.0** as a PCB design learning project.
- Uses a **555 timer** to generate the servo control signal, with a potentiometer for adjustment.
- Includes the complete KiCad project, PCB documentation, 3D views, ERC/DRC reports, Gerbers, drill files, BOM, and position file.
- ERC and DRC checks completed with **0 errors and 0 warnings/violations**.
- The PCB has **not been physically manufactured or tested**.
## Quick Links
- [Schematic PDF](documentation/schematic.pdf)
- [PCB Layout PDF](documentation/pcb-layout.pdf)
- [Front 3D View](assets/pcb-3d-front.png)
- [Back 3D View](assets/pcb-3d-back.png)
- [Gerber Files](fabrication/gerbers/)
- [Drill Files](fabrication/drills/)
- [BOM](fabrication/BOM.csv)
- [Position / Pick-and-Place File](fabrication/position.csv)
- [ERC Report](documentation/verification/ERC.rpt)
- [DRC Report](documentation/verification/DRC.rpt)
---
## Overview
This project was created while working through the training modules by NU Teams.
The main goal was to practice the complete PCB design process in KiCad, including:
- Creating and working with a schematic
- Selecting and assigning footprints
- Designing the PCB layout
- Component placement and routing
- PCB mechanical considerations
- 3D visualization of the board
- Generating fabrication and assembly files
- Running ERC and DRC checks
- Organizing a complete KiCad project for sharing and reuse
The underlying circuit uses a 555 timer to generate the control signal for a servo. A potentiometer is used to adjust the generated pulse, allowing the servo position to be varied. The circuit is kept relatively simple here because the primary focus of this repository is the **PCB design and documentation workflow**.
---
## Repository Structure
Servo-Controller-555/
│
├── .gitattributes
├── .gitignore
├── LICENSE
├── README.md
├── index.html
│
├── Servo Controller 555.kicad_pcb
├── Servo Controller 555.kicad_pro
├── Servo Controller 555.kicad_sch
│
├── assets/
│   ├── pcb-3d-front.png
│   ├── pcb-3d-back.png
│   ├── schematic.png
│   └── pcb-layout.png
│
├── documentation/
│   ├── schematic.pdf
│   ├── pcb-layout.pdf
│   └── verification/
│       ├── ERC.rpt
│       └── DRC.rpt
│
├── fabrication/
│   ├── gerbers/
│   ├── drills/
│   ├── BOM.csv
│   └── position.csv
│
└── external-cad/
    └── Potentiometer_Bourns_PTV09A-1_Single_Vertical.step
---
## Features
- 555 timer based servo controller
- Adjustable servo control using a potentiometer
- Through-hole and SMD components
- Custom component footprints
- 3D PCB visualization
- External STEP model for component visualization
- ERC and DRC verification
- Fabrication-ready Gerber and drill files
- Bill of Materials (BOM)
- Component position / Pick-and-Place file
---
## PCB Design
The PCB was designed with emphasis on:
- Component placement
- Routing and trace organization
- Connector accessibility
- Mounting-hole placement
- Board outline and mechanical clearances
- Clear silkscreen labeling
- 3D representation of the completed PCB design
### PCB Layout
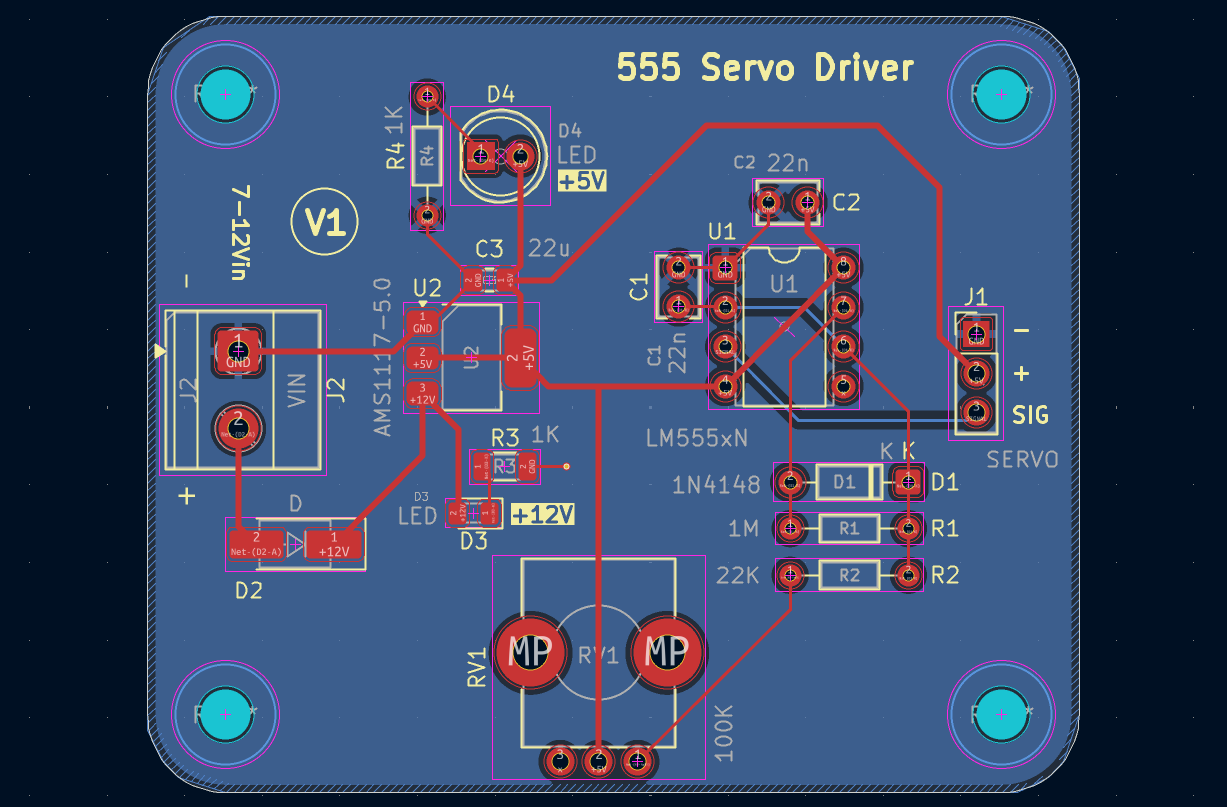
[View PCB Layout PDF](documentation/pcb-layout.pdf)
### Footprints & Libraries
The project uses KiCad libraries and project-defined footprints for the components used on the PCB.
- Standard KiCad footprints are used where applicable.
- Custom footprints are included as part of the project where required.
- The PCB project contains the footprint assignments used by the design.
- The external 3D model used by the potentiometer footprint is documented separately in [External CAD Models](#external-cad-models).
If the project is edited or reused, footprint assignments should be checked in the schematic and PCB files before making design changes.
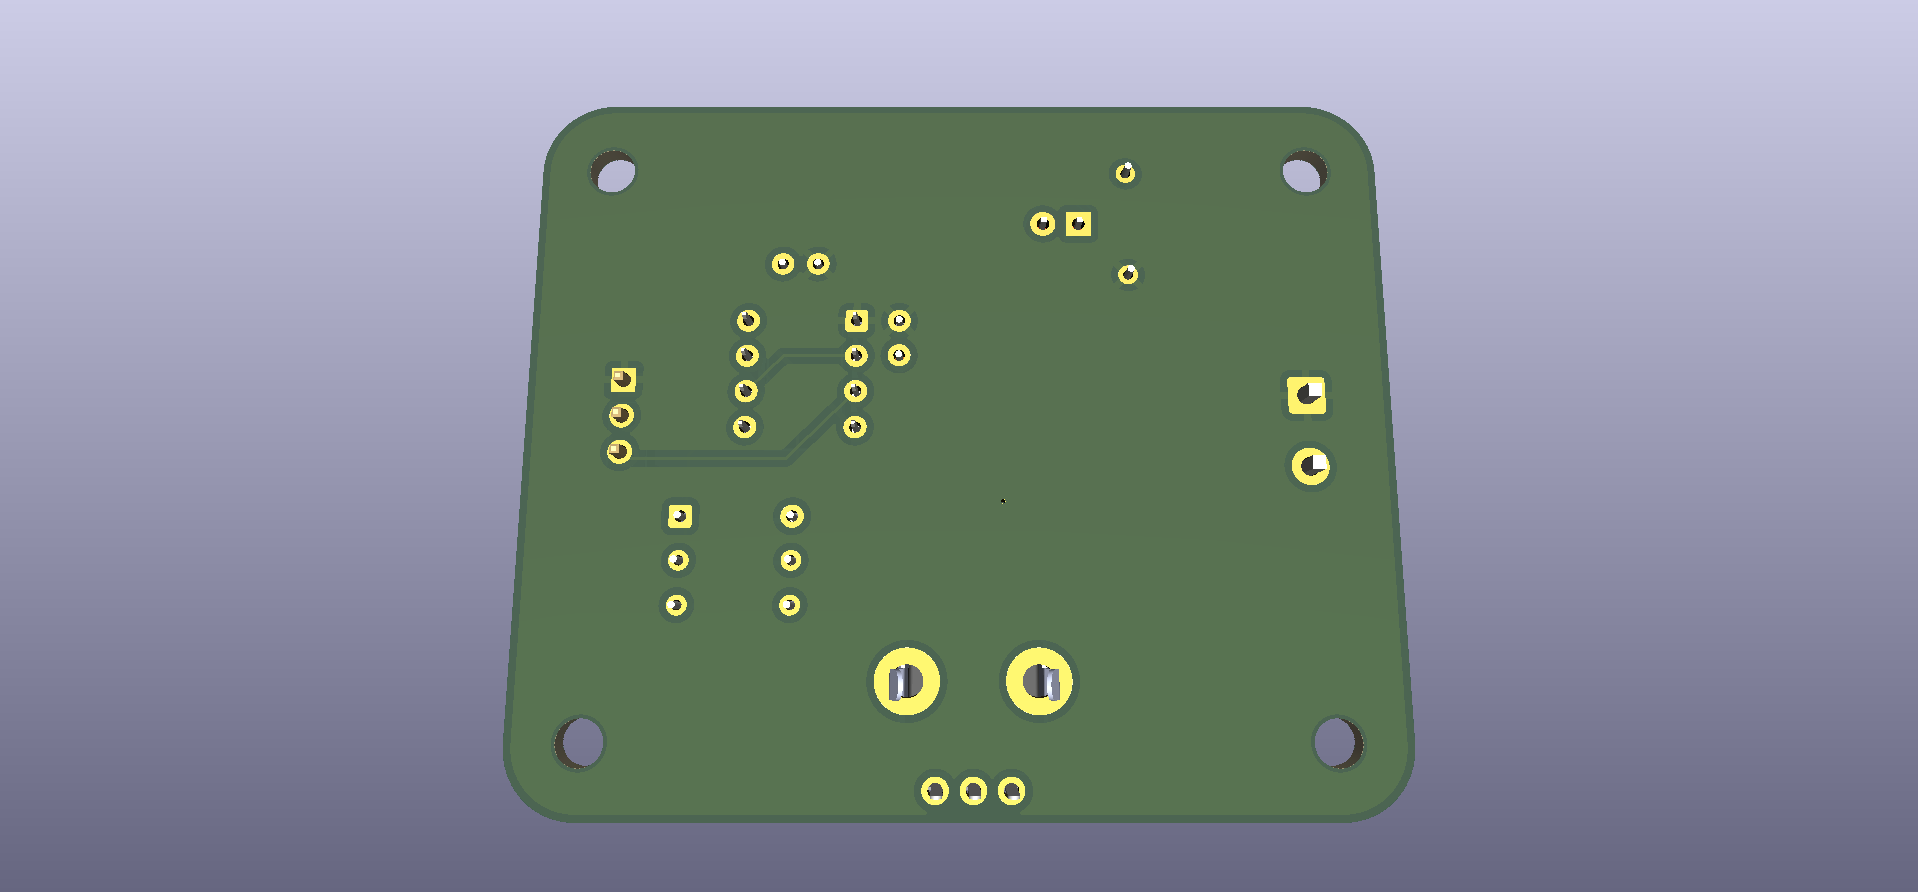
### 3D Views
View Front 3D Model

View Back 3D Model
---
## Circuit Overview
The circuit is based around a 555 timer configured to generate a servo control signal.
A potentiometer is used to vary the timing of the generated pulse, allowing the servo position to be adjusted.
The schematic is included primarily to document the electrical design associated with the PCB.
### Schematic
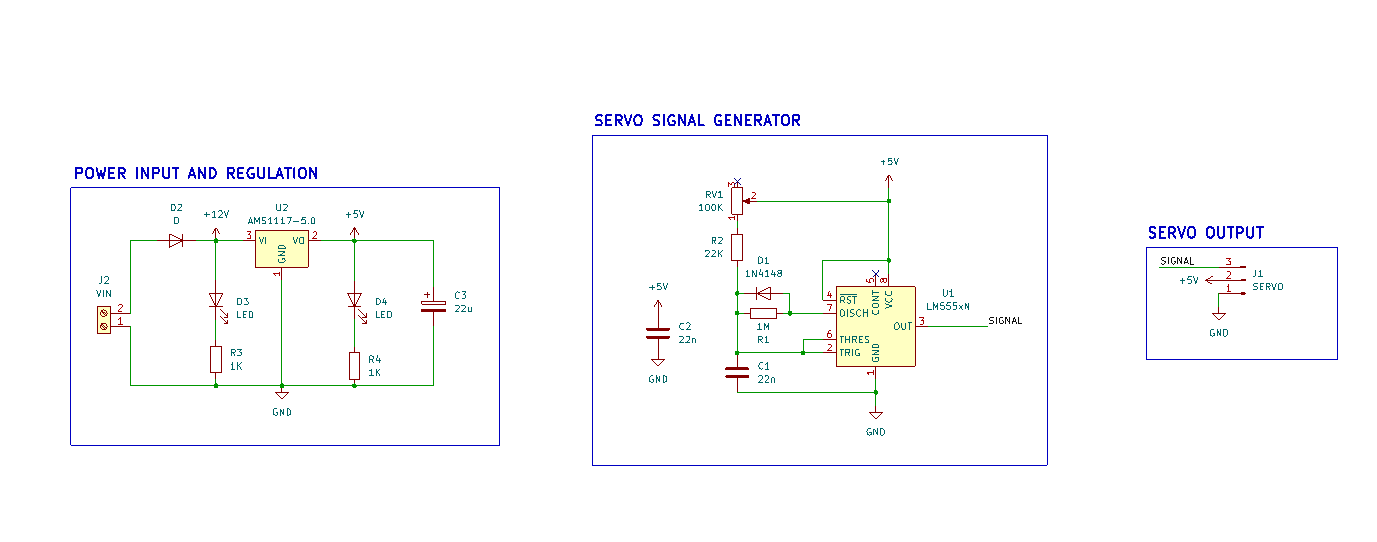
[View Schematic PDF](documentation/schematic.pdf)
---
## Design Verification
The design was checked using KiCad's Electrical Rules Checker (ERC) and Design Rules Checker (DRC).
### ERC
- Errors: **0**
- Warnings: **0**
[View ERC Report](documentation/verification/ERC.rpt)
### DRC
- Violations: **0**
- Unconnected pads: **0**
- Footprint errors: **0**
[View DRC Report](documentation/verification/DRC.rpt)
> These checks verify the design according to the configured KiCad rules. They do not replace physical testing of a manufactured PCB.
---
## Fabrication Files
Although this PCB has **not been physically manufactured**, the repository contains the files generated during the design process for potential future fabrication and assembly.
Available fabrication files
### Gerbers
PCB manufacturing files generated from the PCB layout.
[Open Gerber files](fabrication/gerbers/)
### Drill Files
Drill data generated for the PCB.
[Open drill files](fabrication/drills/)
### Bill of Materials
Component list generated from the KiCad project.
[View BOM](fabrication/BOM.csv)
### Position File
Component placement information generated from the PCB design.
[View Position File](fabrication/position.csv)
---
## External CAD Models
The PCB uses an external STEP model for component visualization in KiCad's 3D Viewer.
The model is stored separately from the KiCad project files:
```text
external-cad/
└── Potentiometer_Bourns_PTV09A-1_Single_Vertical.step
```
The PCB references the model using a project-relative path, so the reference should remain valid when the repository is cloned to another system.
> The redistribution rights of externally sourced CAD models depend on their original license/source. The external model is therefore treated separately from the project's own hardware design files.
---
## Working with the Project
This repository contains the complete KiCad project, including the schematic, PCB layout, project configuration, and supporting project assets.
### Requirements
- **KiCad 10.0** or a compatible version capable of opening the project files.
### Clone the Repository
To clone the project using Git:
```bash
git clone https://github.com/shlok-ac/Servo-Controller-555.git
cd Servo-Controller-555
```
Or use the [GitHub repository page](https://github.com/shlok-ac/Servo-Controller-555) to download the project as a ZIP archive.
### Open in KiCad
1. Clone or download this repository.
2. Open `Servo Controller 555.kicad_pro` in KiCad.
3. From the KiCad Project Manager, open the **Schematic Editor** or **PCB Editor** as required.
The schematic, PCB layout, and project configuration files are kept together so that the project can be opened and edited as a complete KiCad project after cloning.
### Project Files
The main KiCad files are:
- `Servo Controller 555.kicad_pro` — KiCad project configuration
- `Servo Controller 555.kicad_sch` — schematic
- `Servo Controller 555.kicad_pcb` — PCB layout
See [External CAD Models](#external-cad-models) for the STEP model used by the PCB's 3D visualization.
---
## Learning Source
This project was completed while working through the PCB Design Zero-to-Hero training modules by **NU Teams**.
The training material provided the learning framework for the project, while this repository contains my KiCad project files, PCB layout, documentation, verification results, and generated fabrication outputs.
---
## License
Copyright © 2026 Shlok Chorge
This project is licensed under the **CERN Open Hardware Licence Version 2 – Strongly Reciprocal (CERN-OHL-S-2.0)**.
This license allows others to:
- Use and study the hardware design
- Modify and adapt the design
- Manufacture hardware based on the design
- Distribute the original or modified design
Under the Strongly Reciprocal terms, modifications and derivative designs based on this project must be made available under the same license, along with the corresponding source design files.
See [`LICENSE`](LICENSE) for the complete license text.
---
## Author
**Shlok Chorge** · [GitHub Profile](https://github.com/shlok-ac)



